Passport Photo Background Rules: The Right Color by Country (2026)
The correct passport photo background isn't the same everywhere — white, grey, and cream all get required by country, and guessing wrong causes rejections.
You stood against your living room wall, took the shot, cropped it to the right size, and uploaded it. Rejected — "background does not meet requirements." You check the photo again. The wall is white. The lighting looked fine on your phone. So what failed?
There is no single passport photo background standard. The US wants plain white. The UK wants light grey, though it will still take cream. The Schengen Area wants light grey too, and treats white as a fail. Get the crop and expression perfect and the wrong shade still bounces the whole application — the color is graded as strictly as the dimensions are.
Passport Photo Background at a Glance
| United States | United Kingdom | Ireland | Schengen Area | India | Canada | Australia | Japan | China | |
|---|---|---|---|---|---|---|---|---|---|
| Background required | Plain white or off-white | Light grey (cream also accepted) | Light grey or cream | Light grey | Plain white | White or light-coloured, plain | Plain white | Plain white | Plain white |
| Shadows/gradient tolerated? | No | No | No | No | No | No | No | No | No |
| Make one now | US photo | UK photo | 35×45mm photo | Schengen photo | India photo | Canada photo | Australia photo | Japan photo | China visa photo |
Nine countries, three colors, zero tolerance for shadow. That last row is the part most people skip past — and it's the row that actually gets photos rejected.
Why Isn't There One Universal Passport Photo Background Color?
Because each country's passport authority sets its own rule, and there's no single global standard forcing them to agree. The ICAO — the body that defines biometric photo dimensions internationally — doesn't mandate a background shade. It leaves that choice entirely to national governments and, for Schengen visas, to the EU's shared visa policy.
That's the actual mechanism, not a coincidence: the US State Department chose white for contrast against typical American ID-photo backdrops, while EU member states standardized on light grey because it profiles better for facial-recognition edge detection at automated passport gates. Different colors, different reasoning, same underlying dimension standard.
Key takeaway: don't assume "passport photo" means one universal look. A photo shot correctly for one country's passport can fail another's background check while nailing every other spec.
Which Countries Require a Plain White Background?
The US, India, Canada, Australia, Japan, and China all specify plain white or off-white. It's the more common standard globally, which is exactly why people default to it — including when applying for a Schengen visa, where it's wrong.
For a US passport specifically: plain white or off-white, no texture, no drop shadow behind the head, no gradient that darkens toward the frame edges. The State Department rejects photos where the background isn't uniform even when the base color reads as white.
India's Passport Seva portal is stricter still — plain white, no exceptions, photo taken within the last six months. Our India passport photo guide covers the full Passport Seva spec if that's your destination.
Key takeaway: "white" isn't just a color choice here — it means flat white, with no light falloff anywhere in the frame. A backdrop that looks white to your eye can still fail if it's unevenly lit.
Why Does the UK Specify Light Grey Instead of White?
Because HM Passport Office's current default guidance calls for light grey, not white — a deliberate departure from the older cream standard still printed on some regional application forms. Light grey creates cleaner contrast against pale skin and fair hair during the UK's automated photo check, which is the same edge-detection logic behind the EU's Schengen choice.
Cream hasn't been dropped. It's still technically accepted, and Ireland's passport photo standard — which shares the UK's 35×45mm biometric format — allows the same either/or. But if the form in front of you doesn't specify, default to light grey. It clears more UK and Irish checks than cream does, and it won't clash with lighter complexions the way pure white occasionally does.
The UK government's official diagram below shows the framing and background rules side by side — correct examples next to the mistakes that get photos bounced:
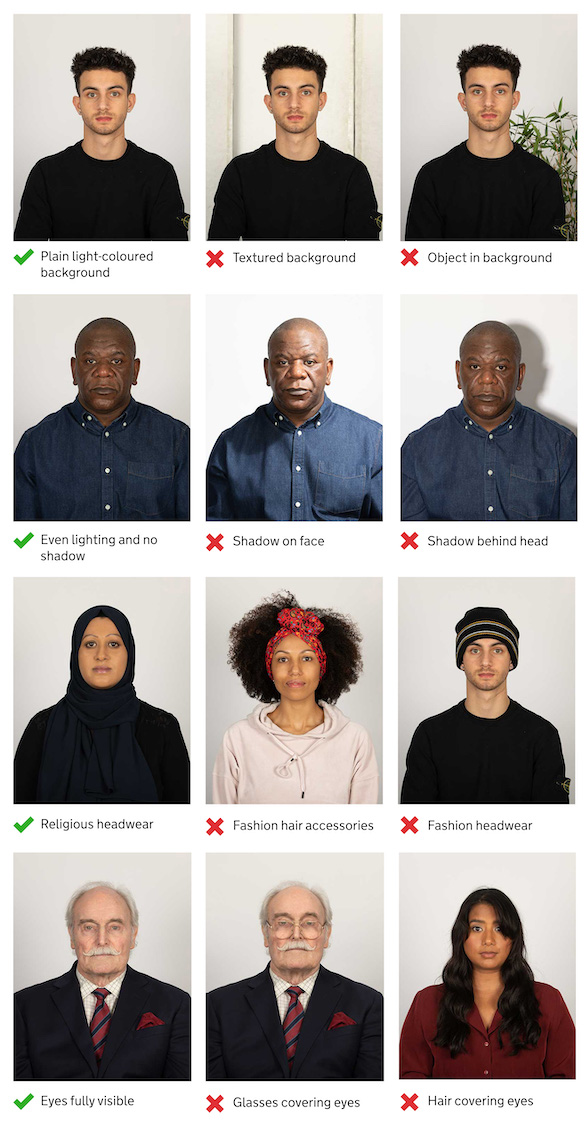
Official do's and don'ts reference from the UK government's passport photo guidance. © Crown copyright, reused under the Open Government Licence v3.0.
The same document sets separate rules for babies and young children, since a squirming infant can't be positioned against a wall the way an adult can:
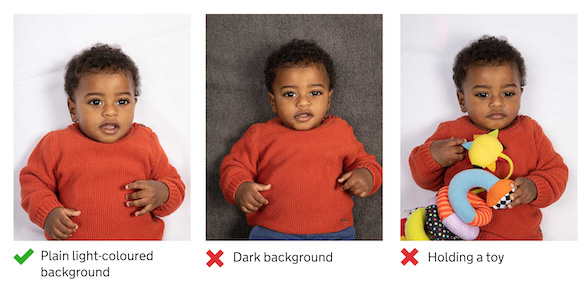
Official child and baby photo guidance from the UK government's passport photo guidance. © Crown copyright, reused under the Open Government Licence v3.0.
For babies under one, the guidance recommends laying them on a plain, light-coloured sheet and shooting from directly above, rather than trying to hold them upright against a backdrop. It's a background problem with a background-shaped solution.
Key takeaway: off-white, cream, and light grey are three distinct specs, not shades of the same thing. Confirm which one your specific form asks for before you shoot — don't assume "light-colored" covers all three.
Why Do Shadows and Gradients Fail Even on a Technically White Wall?
Here's what most guides skip: the color of your wall barely matters if the light hitting it isn't even. A ceiling light throws a soft shadow downward. A window to one side casts a gradient that darkens toward the far edge of the frame. Both show up in the final photo as a background that fails automated review — even though the wall itself is genuinely white paint.
Automated passport photo checks measure background uniformity, not just hue. A gradient from near-white to light grey across the frame reads as non-uniform, which is a fail condition on its own, independent of whether either endpoint color would have passed individually. This is why a photo that looks fine on a phone screen — where you're judging color, not evenness — gets rejected on a government portal that's measuring both.
The fix isn't lighting equipment. It's separating two problems that a single photo conflates: even light on your face (which a ring light or a window facing you handles), and a flat, artifact-free background (which software handles better than any wall ever will). Standing a step or two away from the wall behind you also helps — it keeps your own shadow from falling onto it in the first place.
Key takeaway: light your face, not the wall. Then let a background tool flatten the backdrop to a true, gradient-free color instead of trying to photograph a perfect wall.
Is It Better to Remove the Background Than to Reshoot?
Usually, yes — and it's worth saying plainly, because most guides push you toward finding a "better wall" instead. A plain wall almost never actually is plain once a camera looks at it: paint texture, a faint color cast from nearby furniture, or a shadow you didn't notice all show up in the file even when the wall looked fine in person. Reshooting against a different wall just trades one set of imperfections for another.
Removing the background and replacing it with a flat, spec-correct color skips that entirely. It also fixes a problem reshooting can't: a background that's the wrong color for your destination country. If you already have a decent, evenly-lit photo of your face and just need the backdrop corrected, running it through a background remover is faster and more reliable than setting up another shoot.
There's one thing to watch for when you do this: hair-edge artifacts. Background-removal software cuts along the boundary between your hair and the old backdrop, and fine or flyaway hair strands are the hardest edge for any algorithm to trace cleanly. Look for a faint halo of the old background color still clinging to the hairline, or strands that look artificially sharp-edged, like they were cut with scissors rather than photographed. Both are signs the cutout needs a second pass or a photo with slightly less hair movement.
Key takeaway: removing the background beats reshooting for a correctly-lit face — but always zoom in on the hairline afterward and check for leftover color fringing before you submit.
Digital File or Print Sheet — Which One Do You Need?
A "passport photo" is actually two different files depending on what you're doing with it, and using the wrong one is a quiet way to get rejected even when the background is perfect. Uploading to an online portal and handing a print to a passport office need different outputs from the same source photo.

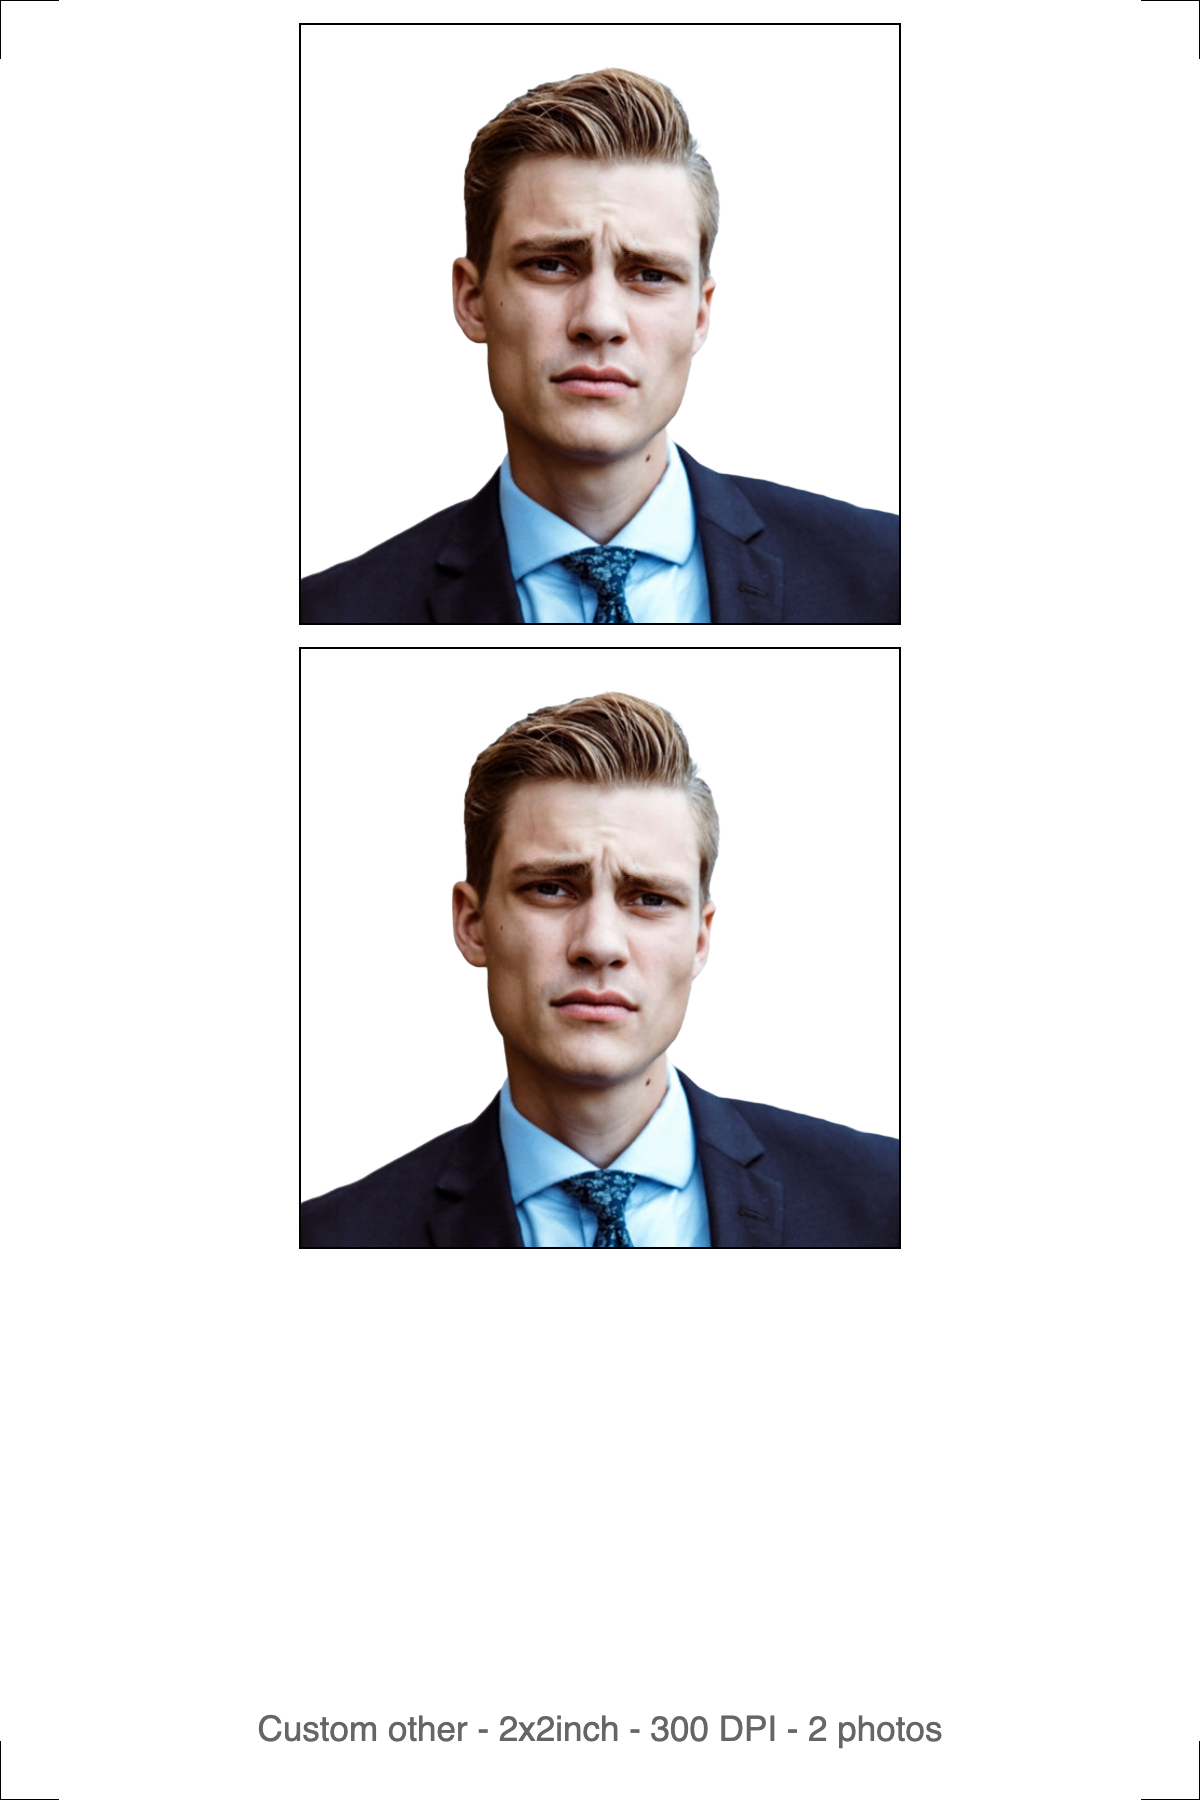
Left: the digital file for online forms. Right: the 4R print sheet for a photo lab.
The digital file is one photo, cropped to the exact ratio, background replaced with a flat spec-correct color, compressed to your portal's KB limit. No borders, no margin, no cut marks — portals measure your head position against the photo's own edges, so an extra border shifts every measurement and fails the check even when the background and crop are otherwise right.
The print sheet tiles that same photo onto standard 4R (6×4 in) photo paper at 300 DPI, with cut guides. Print it at actual size — turn off "fit to page" or "scale to fill" in your printer dialog, since scaling changes the photo's real physical dimensions along with the head height. Use photo paper, not plain copier paper; most offices reject the latter outright.
Key takeaway: upload the digital file, print the sheet — never crop the print sheet down to make an upload, and never hand the single digital file to a print lab expecting the correct physical size.
Should You Use Automatic or Manual Mode?
Automatic mode is the default, and it's right for most photos: it detects your face, crops to the required ratio, removes the background, and applies your chosen background color in a single pass. No manual selection needed.
Manual mode hands you the controls instead — you crop the region yourself, then the background gets removed, then you download. Three steps instead of one. Switch to it when automatic detection misreads the framing, which happens most often with partial face occlusion, an unusual camera angle, or a baby who won't hold still and look forward.
The toggle sits above the upload area, and it needs to be set before you upload — it determines which processing screen you land on next.
Key takeaway: default to automatic. Only reach for manual when you already know the subject is going to trip up face detection.
How to Fix a Passport Photo Background Using imresizer
- Go to imresizer.com/resize-image-to-passport-size
- Upload your photo — click the button or drag and drop. JPG, PNG, and WebP are all supported.
- If the photo looks dim or has a color cast, use imresizer's lighten tool first — this makes the eventual background cutout edges cleaner, especially around hair.
- Select your destination country's preset, or use the custom passport tool for a size that isn't listed. The correct background color is applied automatically.
- Check the hairline on the result for stray color fringing before you download — if you see any, rerun the background removal step.
- Download — you get both a digital file for upload and a 4R print sheet, sized and backgrounded correctly for either use.
Everything runs in your browser — no signup, no watermark. Your photo never leaves your device.
Key Takeaways
Free Passport & Visa Tools
Frequently Asked Questions
What color background does a passport photo need?
It depends on the country. The US, India, Canada, Australia, Japan, and China require plain white. The UK and Ireland accept light grey or cream, with grey the current default. The Schengen Area requires light grey specifically, not white. Always confirm your destination's exact rule — a compliant photo for one country often fails another's check.
Can I use a white background for a Schengen visa photo?
No. Schengen visa photos require light grey, not white. This trips up applicants who assume every passport-style photo uses the same white backdrop as a US or Indian passport. A white photo that's otherwise perfect on dimensions and framing will still be rejected on background color alone.
Why was my passport photo rejected even though the background looked white?
A shadow or gradient across the backdrop can fail a photo even when the base color is genuinely white — automated checks measure uniformity, not just hue. Uneven lighting behind the subject, not the wall's actual color, is one of the most common rejection reasons for photos taken at home.
Is the UK passport photo background grey or cream?
Both are technically accepted, but light grey is HM Passport Office's current default recommendation. Cream appears on some older forms and regional applications, so check your specific form first. If it doesn't specify, light grey is the safer default — it clears more UK and Irish checks than cream does.
How do I change my passport photo background without a studio?
Use a background-removal tool to strip the original backdrop, then apply the solid color your destination country requires. imresizer's background remover does this from any reasonably well-lit photo — no studio, green screen, or perfect wall required, though it's worth checking the hairline afterward for stray color fringing.
More Passport & Visa Guides
This guide is part of our Passport & Visa hub — tools and guides for creating compliant passport, visa, and ID photos from home.