How to Make a Passport Photo at Home (Free, No App)
Make a passport photo at home in under a minute — no photo booth, no studio. Correct 2x2 in / 35x45mm sizing, white background, and file size, all in your browser.
You need a passport photo by tomorrow and the nearest photo booth closes at 6pm. Or you tried anyway, and the office rejected it — wrong background, wrong crop, file too big for their upload form.
You can make a passport photo at home that actually passes, using nothing but a phone camera and a laptop — and the whole thing takes a minute or less once you're inside the tool. The trick isn't a fancy camera. It's hitting the exact specs — photo size in millimeters, head height in millimeters, file size in kilobytes — that most people guess at instead of measure.
Passport Photo at a Glance
The two specs you'll run into most often are the US 2×2 in square and the 35×45mm rectangle used almost everywhere else:
| Requirement | United States (2×2 in) | Most other countries (35×45 mm) |
|---|---|---|
| Photo size | 2 × 2 in (51 × 51 mm) | 1.38 × 1.77 in (35 × 45 mm) |
| Shape | Square | Rectangular (portrait) |
| Head height (chin to crown) | 1–1.38 in (25–35 mm) | 1.14–1.34 in (29–34 mm) in the UK; 32–36 mm for most Schengen states |
| Eye line from bottom | 1.13–1.38 in (29–35 mm) | Not specified — head height governs the crop |
| Background | Plain white or off-white | Plain light grey or cream in the UK and Ireland; plain white in many others |
| Used by | US passports and visas | UK, Ireland, Schengen, and more |
| Make one now | Make a 2×2 in passport photo | Make a 35×45mm passport photo |
The 35×45mm format is used for the UK, Ireland, and most Schengen-area countries. Other countries — including the US, at 2×2 in (51×51 mm) — set their own size, so always confirm against your destination's official requirements before printing or uploading. Background color in particular is not universal: the US wants white or off-white, the UK wants light grey or cream, and plenty of other authorities specify plain white. Check the number and the color for your country, then resize to a 35×45mm passport photo if that's the spec that applies.
Why Do So Many Passport Photos Get Rejected?
Three reasons come up again and again: the background isn't the plain color your country asks for, the face isn't sized within the required range, and the file doesn't meet the portal's KB limit. A photo booth fixes the first two automatically. At home, you're doing all three by eye — which is exactly where guesswork creeps in.
Here's what most guides skip: rejection is almost never about photo quality. A slightly soft phone photo passes fine. A photo with the head 5mm too high on the frame does not. Compliance is a measurement problem, not a photography problem.
Key takeaway: Get the background, head size, and file size numerically correct, and a phone photo will pass just as reliably as a studio shot.
How Do You Take Your Own Passport Photo Selfie at Home?
Stand against a plain, light-coloured wall with even light on your face, not behind you — backlighting is the most common cause of a shadowed face. Hold your phone at eye level, about arm's length away, and frame loosely: head, shoulders, and upper body, since you'll crop tighter afterward.
The rules that get photos bounced are boring and specific, so it's worth having them in front of you rather than in your head:
The UK government's official diagram below shows the same points visually. It's UK guidance specifically, but the framing, expression, and background principles carry over to most countries:
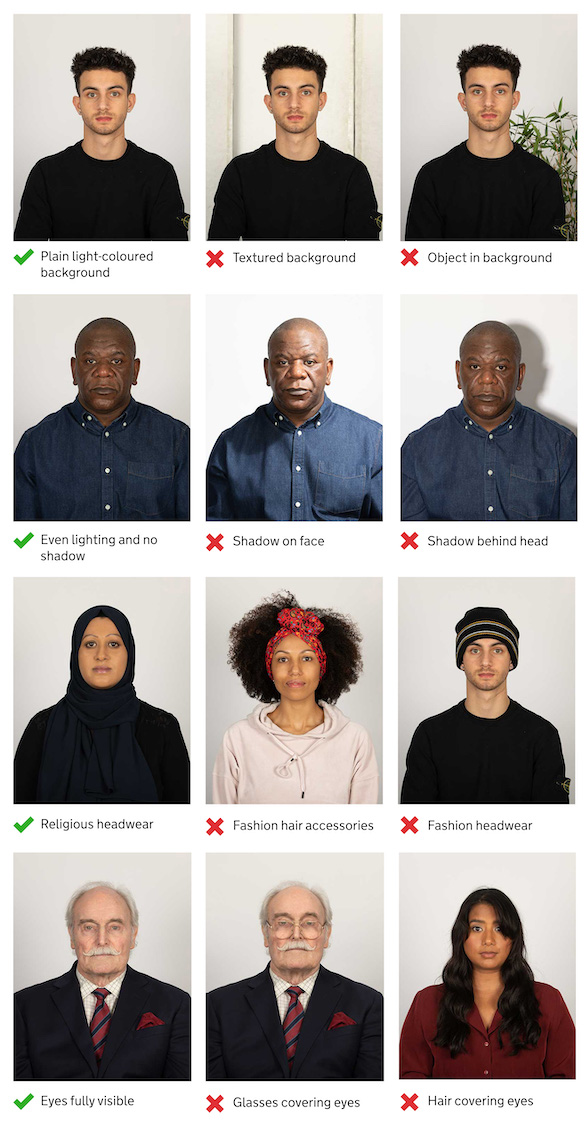
Official do's and don'ts reference from the UK government's passport photo guidance. © Crown copyright, reused under the Open Government Licence v3.0.
Key takeaway: A self-taken photo passes on the same terms as a booth photo — the booth just enforces the rules for you. Check yours against the diagram above before you submit it.
How to Make a Passport Photo at Home Using imresizer
- Go to imresizer.com/resize-image-to-passport-size
- Upload your photo — click the button or drag and drop. Supports JPG, PNG, and WebP.
- Pick your mode before processing — automatic or manual (more on the difference below).
- Choose your background color — white for the US, light grey or cream for the UK, whatever your country specifies.
- Set your target file size in KB if your portal specifies one (common values: 20 KB, 50 KB, 100 KB, 240 KB).
- Download — you get both a digital file and a print sheet, covered in the next section.
Everything runs in your browser — no signup, no watermark, and your photo never leaves your device.
Digital File or Print Sheet — Which One Do You Need?
imresizer gives you two different outputs from the same photo, because "a passport photo" means two different files depending on what you're doing with it. Uploading to an online form and walking into a print shop need different things, and using the wrong one is a quiet way to get rejected.

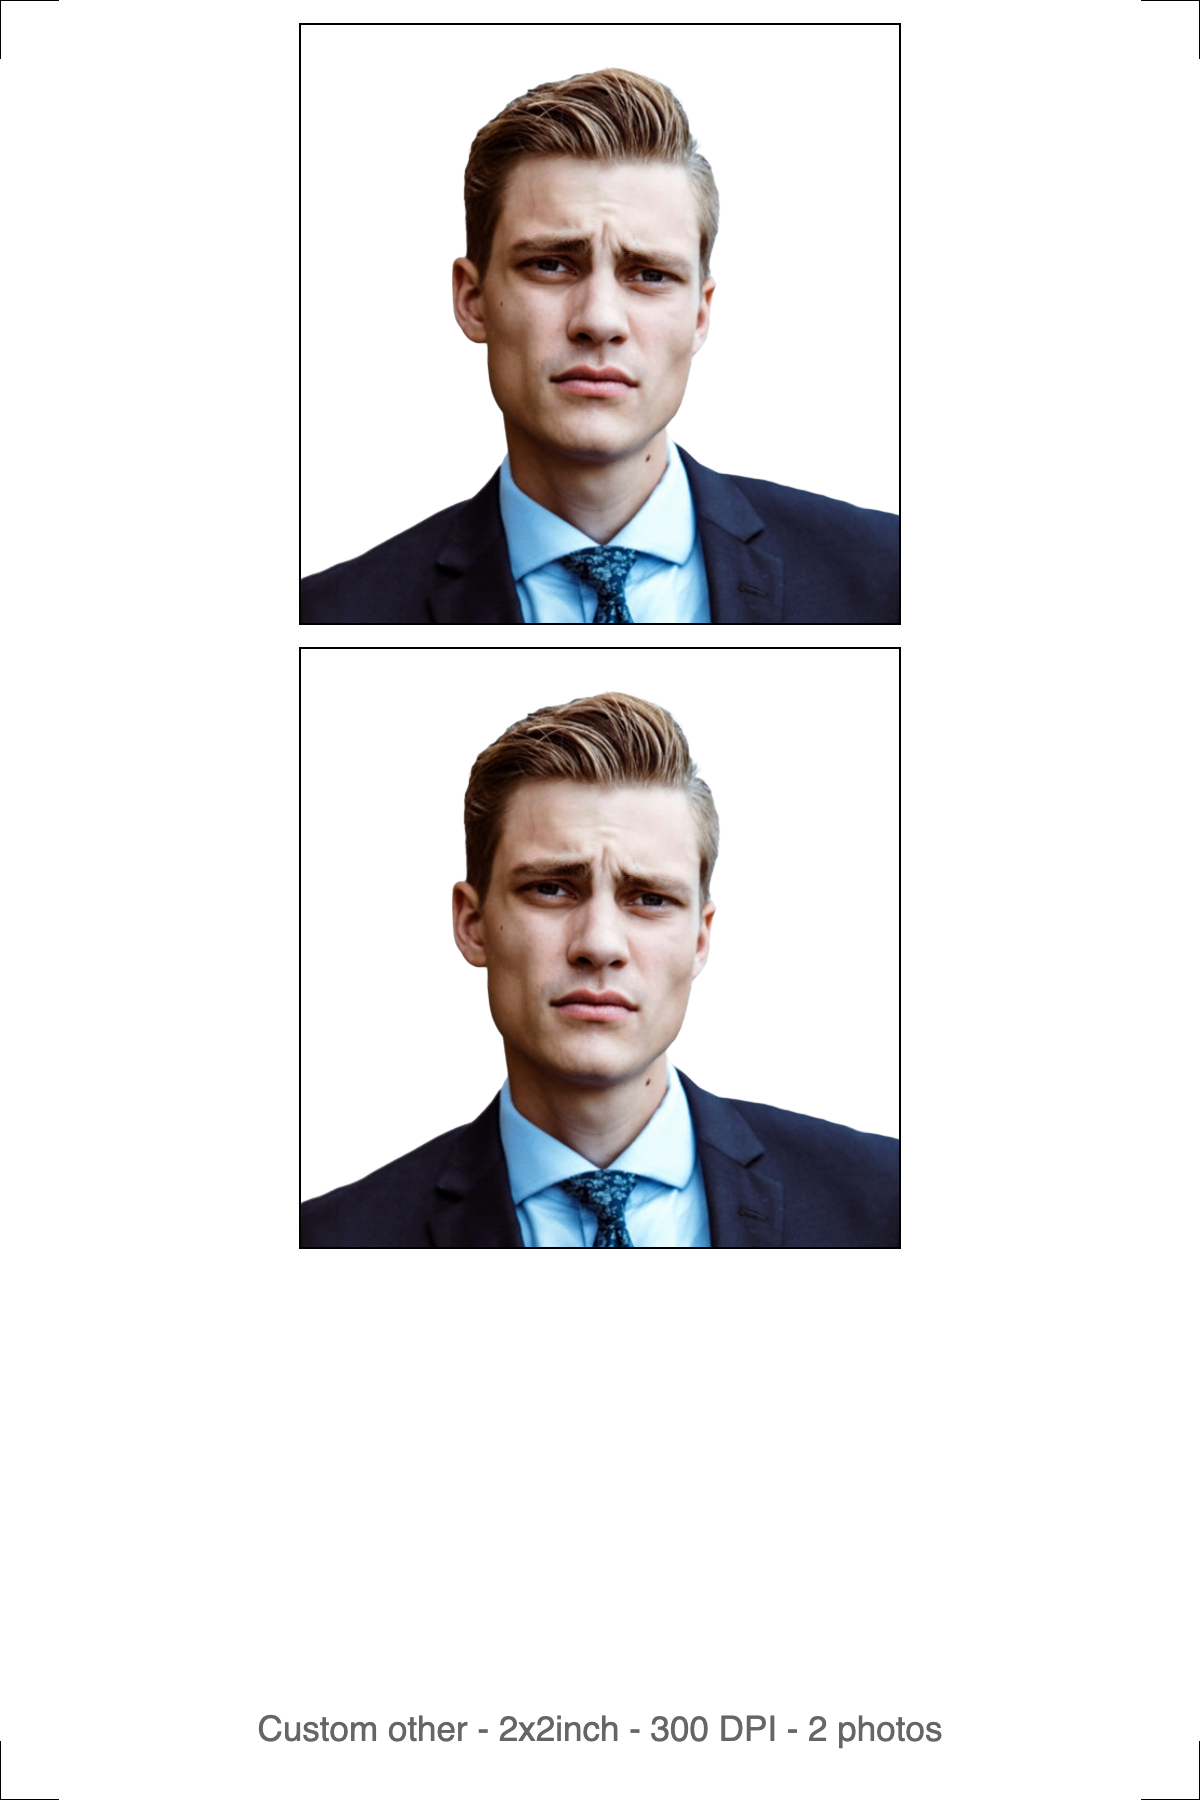
Left: the digital file for online forms. Right: the 4R print sheet for a photo lab.
The digital photo — for online submission
One photo, cropped to the exact ratio, background replaced, compressed to your portal's KB limit. This is the file you attach to a visa application, a passport renewal form, or an exam registration portal.
Nothing else goes in the file: no borders, no cut marks, no white margin around the edge. Portals measure your head against the photo edges, so an extra border shifts every measurement and fails the automated check even when the face itself is perfect.
The print sheet — for a photo lab or home printer
The same photo, tiled multiple times onto a standard photo paper size at 300 DPI, with cut guides and a caption strip telling you exactly what's on the sheet. This is the file you hand to a print shop or send to your own printer. A few things that matter:
Key takeaway: Upload the digital file, print the sheet — never crop the sheet down to make an upload, and never send the single digital photo to a print lab expecting the right physical size.
Should You Use Automatic or Manual Mode?
Automatic mode is the default, and it's what most people should use: it detects your face, crops to the required ratio, removes the background, and applies your chosen background color in one pass — no manual selection needed.
Manual mode hands you the controls instead. You crop the region yourself first, then the background gets removed, then you download — three separate steps instead of one. Switch to it when automatic detection gets the framing wrong, which happens most often with partial face occlusion, an unusual angle, or a baby who won't sit still and look at the camera.
The toggle sits above the upload area — set it before you upload, since it decides which processing screen you land on next.
What Are the Do's and Don'ts for a Baby's Passport Photo?
Babies and young children follow the same size and background rules as adults, but a few requirements relax — and one or two get stricter. The rules below are the UK's, which are among the most clearly documented; most countries land in a similar place, but check yours, since the age cutoffs in particular vary.
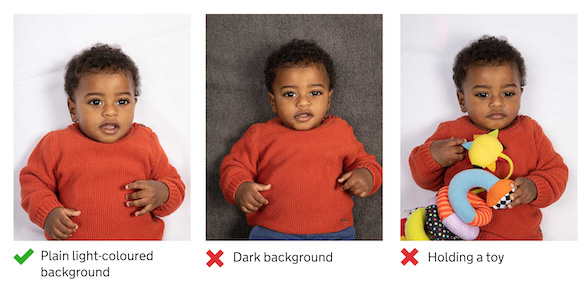
Official child and baby photo guidance from the UK government's passport photo guidance. © Crown copyright, reused under the Open Government Licence v3.0.
Key takeaway: For a baby under one, manual mode is usually the easier path — you control the crop yourself instead of relying on face detection to work on a squirming subject.
How Do You Hit the Exact File Size Limit?
This applies to the digital file, not the print sheet — and it's where most home attempts fail even after the photo looks correct. A phone photo, once resized to passport dimensions, might still land at 300–800 KB — well over the 20–50 KB many government and visa portals enforce.
Compression by "quality slider" is unreliable here: an 80% quality setting might produce a 40 KB file for one photo and a 120 KB file for another, depending on background detail. That's why targeting kilobytes directly, rather than a quality percentage, matters more for passport photos than almost any other image type.
imresizer.com/templates/compress lets you punch in any KB target directly, or use a dedicated preset for common ones — 20 KB, 50 KB, 100 KB, and 240 KB — so you compress straight to your portal's exact number instead of guessing at a quality percentage.
Key takeaway: Set the file size as a hard target in KB, not a quality percentage — passport portals reject on file size, not on how the compression was achieved.
Key Takeaways
Free Passport & Visa Tools
Frequently Asked Questions
Can I take my own passport photo at home?
Yes. Most countries accept self-taken passport photos as long as they meet the exact size, background, and head-position specs, and the photo was taken within the last six months. Use a plain wall, even lighting, and a tool like imresizer to auto-crop and set the background to the color your country requires — the same result a photo booth produces, without leaving your house.
What size does a passport photo need to be?
In the US, it's 2×2 inches (51×51 mm) at 600×600 px minimum. Most other countries use 35×45 mm. Head height, measured from chin to crown, typically falls between 25 and 36 mm depending on the country — 25–35 mm in the US, 29–34 mm in the UK, 32–36 mm across most Schengen states. Check your specific country's requirement before submitting.
Why does my passport photo keep getting rejected online?
The three most common reasons are a background that isn't the plain color required (or has a shadow on it), a head size outside the required range, and a file that exceeds the portal's KB limit. Fix each numerically — background via a background remover, exact crop via a passport-ratio crop tool, and file size via a KB-target compressor — rather than adjusting by eye.
What file size should a passport photo be?
It depends on the portal. US passport renewal forms typically cap uploads at 240 KB. Many visa and government ID portals set a stricter 20–50 KB limit. Check your specific form's stated limit and compress to that exact number rather than guessing from a quality percentage. File size limits apply to the digital upload only — print sheets stay uncompressed at 300 DPI.
Can I use a selfie for a passport photo?
Yes, if it's shot straight-on at eye level with a neutral expression and even lighting — avoid selfie angles from above or below, since most countries reject photos where the face isn't level and forward-facing. Turn off any beauty filter or automatic skin smoothing first; retouching that alters your features is a rejection reason on its own. Crop and background correction afterward matter more than the camera used.
Can I print passport photos at home?
Yes, if you print on photo paper at 300 DPI with scaling turned off. imresizer's print sheet lays your photo out at true physical size on 4R (6×4 in) paper with cut guides, so a home printer or a drugstore kiosk both produce the correct dimensions. Plain copier paper is usually rejected — the print needs a photo-quality finish, glossy or matte.
More Passport & Visa Guides
This guide is part of our Passport & Visa hub — tools and guides for creating compliant passport, visa, and ID photos from home.